Employees Overview
Employee Profiles and Related Settings
![]()
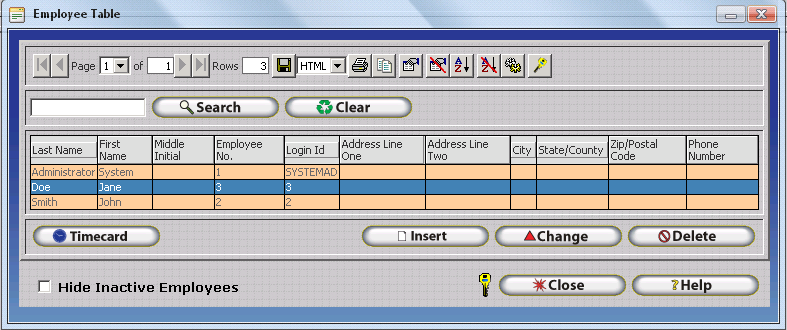
Employee Profiles serve as the primary point of entry for employee related settings. The Employee Table, as accessed from the Employee Button on the Main InfiniTime Toolbar, lists all employees within the InfiniTime software. After the initial installation, entry of employee demographic data is the first essential task that must be performed. Employees can either be inserted manually or imported from a comma separated (.csv) file. If employee demographic data is available from an existing external application creating employee records using the Import Tool can significantly reduce data entry time for organizations with more than 25 employees. An overview of the Employee Table and the Employee Update Form, as used to define employee profiles and related settings, is provided below.
Insert â Displays the employee update form. Used to Insert a new employee.
Change â Opens the Employee Update Form for the highlighted employee to view or alter an employee's profile and related settings.
Delete â Deletes the highlighted employee from the InfiniTime Database. All timecard activity associated with the employee will also be removed.
Timecard â Opens the Timecard Activity window and displays timecard information for the highlighted employee only.
Hide Inactive Employees - When this option is checked inactive employees will not be listed in the employee table.
It should be noted that the InfiniTime Application is licensed by employee count - if the maximum employee count, as defined by the Software License for a given installation, is reached the Insert Button on the employee table will be hidden and will not be available until 1.) Existing employees are inactivated to reduce the existing number of employees below the maximum employee count or 2.) Additional employee licenses are purchased and the InfiniTimeSoftware License is updated to reflect the increased Maximum Employee Count.
Employee Update Form Introduction
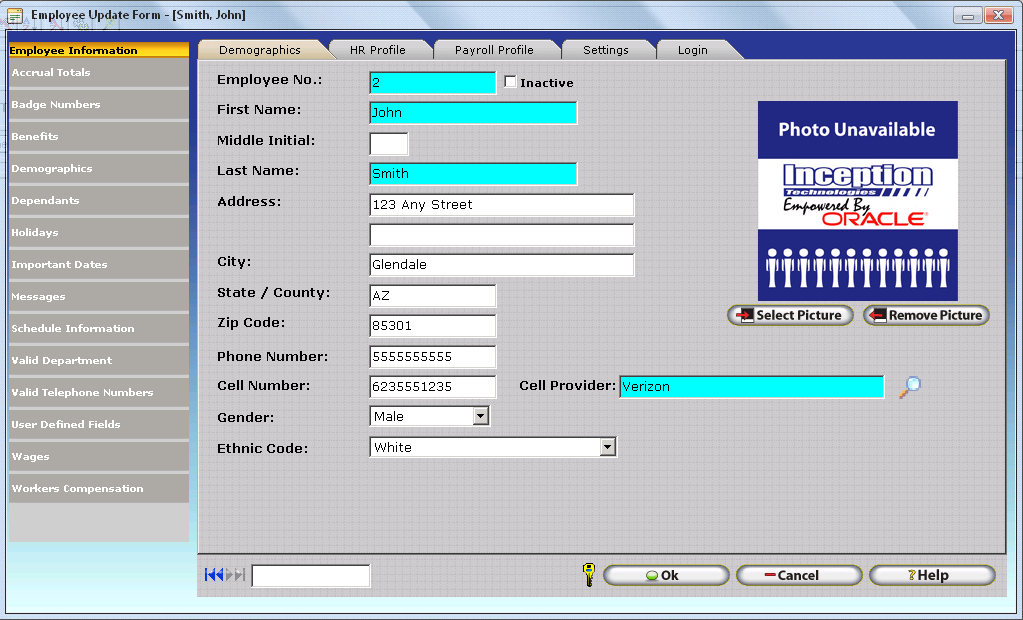
As the central location for all employee related Demographics, HR Related Information, and Settings the Employee Update form can be overwhelming at first glance. As previously mentioned, InfiniTime includes specific features to ensure required details are entered when creating new records. Pay special attention to any required fields, as shown in blue, below which must be configured. If a user should attempt to click OK before completing all required fields the InfiniTime Software will display a warning and prompt the user to complete any required fields that were missed.

Employee Update Form - User Interface Introduction
Settings on complex forms within InfiniTime such as the Employee Update Form, the Policy Update Form, and the Reader Configuration Update Form, are separated into logical groups according to function by 1.) Section and 2.) Tab as illustrated below.

In this way, the Employee Update Form is broken into separate sections, and separate tabs within those sections for clarity and ease of use. Details on each section of the Employee Update Form and related settings are provided below.
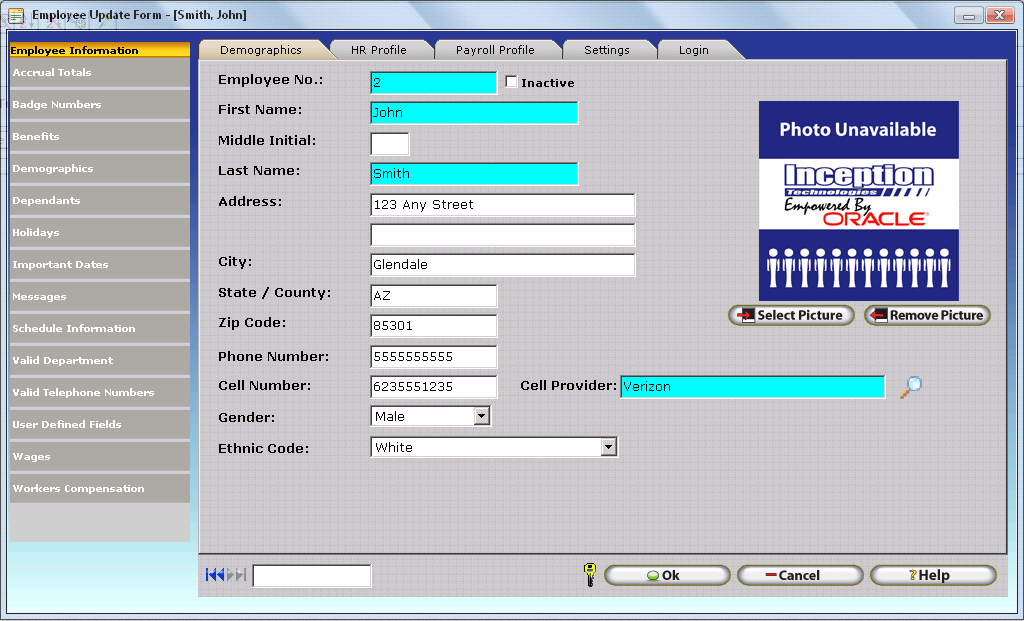
Demographics Section
In the Demographics tab you will be able to enter basic information about the employee such as employee number, name, address, gender, ethnic code and you can also attach a picture to the employee record. Required fields are noted as such in the field description below. Should a required field be left blank upon attempting to save the record by clicking the OK button, the system will prompt the user to fill out the required fields that were missed.
Demographics Tab
Employee Number
- This unique number is a required field and it is used as a point of reference for the employee record.
Inactive - Checking this box will change the employeeâs status to inactive. Inactive employees do not count towards the global employee limit, nor will they show up on reports. Employees that are set to inactive will be highlighted in red in the employee table. This feature is useful to keep details on file for employees who are no longer employed by your organization. Inactive employees will not be available for reporting or other InfiniTime features where you are prompted to select an employee. The Date of Termination and Termination Reason fields will be displayed on the Employee Update Form when the Inactive option is checked. Details on how to define termination reasons are provided below.
Date Of Termination - This date field is the date the employee ended work with the company.
Termination Reason - This field will allow you to enter a reason of why the employee was terminated, allowing you to maintain accurate records of the employeeâs status. Termination Reasons must first be defined on the Termination Reasons Table before they can be assigned to an employee. Click on the Lookup Magnify Glass to the right of the Termination Reason field to open the Termination Reason Table.
Termination Reason Table

The Termination Reasons Table allows you to keep a list of descriptions of why an employee was terminated which allows you to keep your Human Resources information current and up to date. Termination reasons can be assigned to an employee after their status has been set to inactive within the Employee Table.
To assign Termination Reasons to an employee:
1.) Define Termination Reasons within the Termination Reason Table.
a.) Open the Termination Reason Table by clicking on Lookups, Employee Setup, Human Resources Lookups, and Termination Reasons.

b.) Click insert to open the Termination Reason Update Form.
c.) Type a termination reason into the field provided and click OK to save it.

d.) Repeat step C for all applicable termination reasons.
2.) Assign Termination Reasons to inactive employees.
a.) Open the Employee Table by clicking on the Employee Button on the main menu.
b.) Ensure the Hide Inactive Employees option is unchecked.
c.) Locate an inactive employee, highlight their record, and click change.
d.) Enter a termination reason into the termination reason field at the bottom of the form as shown.

e.) Click OK to save the record.
First, Middle Initial, and Last Name - First and Last Name fields are required.
Address, City, State, County or Province, Zip/Postal Code, Phone Number - Enter the appropriate contact information for the employee.
Cell Number
- Enter the employee's cell phone number. This field is primarily intended for Employee and Supervisor Exception Notifications, which when enabled, are automatically sent to employees and / or supervisors when exceptions occur. Only numeric digits should be entered in this field. Do not enter dashes or parenthesis to separate the area code from the local phone number.
Cell Provider - The Cell Provider is displayed as a required field if the Cell Number is filled. Select the employee's cell phone carrier by clicking on the Lookup Magnify Glass and selecting the appropriate carrier. If the employee's cell phone carrier is not present in the list of Cell Phone Providers it must be added with the correct SMS Email Gateway address. The SMS Email Gateway address for a given cellular carrier can be obtained by contacting technical support personnel for the respective carrier or by sending an SMS text to any email address from a device on the respective carrier's network. Exception Notifications utilize the cell phone provider's SMS Email Gateway to send SMS Notifications to supervisors and employees. Additional details can be found within theException Notifications section of this document.
Gender - Select the sex of the employee from the drop down list.
Ethnic Code - Select from the drop down list the correct ethnic code of the employee.
Picture (Optional) - Click on the Select Picture button to choose an employee image or company logo. This will bring you to the File Selection window. Choose the path, then select the file. For best results select a .jpg file, 100 X 100 pixels, not larger than 256 kb. Click the Remove Picture button to remove the image previously selected.
HR Profile Tab
The HR Profile Tab includes HR Related Employee details such Primary Email Address, Social Security Number, Hire Date, Emergency Contact, and review dates. Remember, only required fields must be entered. All other fields are optional, though some are intended for specific purposes as noted below.
Job Title - Describe the Employee's Job Title in this field.
Employment Status
- Select the appropriate Employment Status from the Employment Status Type table for the employee. Click on the Lookup Magnify Glass to the right of the Employment Status field to open the Employment Status Table.
Employment Status Types Table�
Employment Status Types are used to define employment status for individual employees in accordance with the rules and guidelines set forth by the United States Equal Employment Opportunity Commission and can be used for tracking purposes to show employee distribution across various Employment Status types.
![]()
Insert
- Adds a blank record to the Employment Status Types Table. To assign an Employment Status Type to an employee, select the desired Employment Status and click on the select button.
Delete
- Deletes the selected Employment Status from the Employment Status Types Table. If an Employment Status is assigned to employees InfiniTime will not permit it to be deleted.
Email Address
- Enter the Primary Email Address to be kept on file for the employee. If enabled, Employee Email Exception Notifications will be sent to this email address.
Twitter Screen Name - Enter the employee's Twitter Screen Name to be kept on file for Public Relationship management purposes if desired.
SS/SI/NI Number
- Social Security, Social Insurance, or National Insurance Number field of the employee and must be a unique number.
Default Wage - Denotes the employee's default hourly wage. The Default Wage is used for employee Wage Calculations if a Department / Job / Task specific wage is not defined for specific punch pairs Department / Job / Task combination.
\EEO Type - This field is a job classification given to the employee in accordance of the Equal Employment Opportunity Commission. Click on the Lookup Magnify Glass to the right of the Employment Status field to open the Equal Employment Opportunity Types Table.
Equal Employment Opportunity Table
Insert
- Adds a blank record to the Employment Status Types Table. To assign an Employment Status Type to an employee, select the desired Employment Status and click on the select button.
Delete
- Deletes the selected Employment Status from the Employment Status Types Table. If an Employment Status is assigned to employees InfiniTime will not permit it to be deleted.
WCC Description
- Click on the Lookup Magnify Glass to the right of the Employment Status field to open the Equal Employment Opportunity Types Table.
Workers Compensation Code Table
Workers compensation categories are optional and can be used to group employees according to work place exposure codes which are controlled and designed by the National Council of Compensation Insurance (NCCI).

Insert
- Opens the Worker Compensation Code Update Form which can be used to enter new Workers Compensation Code Descriptions to the Workers Compensation Code Table. One record should be created for each Workers Compensation Code used by your organization.
Change
- Opens the Workers Compensation Code Update form for the selected Workers Compensation Code. The InfiniTime Administrator may then alter the Workers Compensation code as desired.
Delete
- Deletes the selected Workers Compensation Code from the Workers Compensation Code Table. If an Employment Status is assigned to employees InfiniTime will not permit it to be deleted.
Emergency Contact Information - Enter the Name, Relationship, and Phone number for the employee's emergency contact to be kept on file in case of emergency.
Date of Birth
- Date employee was born.
Date of Hire - Required Field. Enter the date the employee began working for your organization. The Date of Hire is used by the InfiniTime Accruals System, Holidays, and Exceptions. It is important to note that InfiniTime will not create Holiday Records or exceptions for an employee before their date of hire. Additionally, employee accrual totals are tracked from the employee's date of hire forward in accordance with Accrual Type Settings and related Accrual Calculations.
Adjusted Hire Date - The Adjusted Hire Date overrides the Date of Hire. If an employee was previously terminated and rehired, an Adjusted Hire Date should be set. When set, InfiniTime will use the Adjusted Hire Date in place of the Date of Hire for all functions which reference the Date of Hire such as Accruals, Holidays, and Exceptions.
Last Performance Review Date - Enter the date of the employee's last performance review to be kept on file.
Last Wage Review Date - Enter the date of the employee's last wage review to be kept on file.
Last Raise Date
- Enter the date of the employee's last raise review to be kept on file.
Payroll Profile Tab
The Payroll Profile Tab includes fields related to employee taxes, pay method, and direct deposit.
Pay Method - In this drop down list, you may choose from Hourly, Per Diem, Salary and Other. This designates the type of pay the employee falls under.
Pay Type - The list consists of Exempt, Non-Exempt, and Temporary. This also helps classify what category the employee falls under.
Additional Payroll Id - The Additional Payroll ID is used for some payroll export formats which require an employee specific identifier separate from the Employee ID on the Demographics Tab. Additional details on the use and configuration of Payroll Export, which permits transferring of employee hours and earnings to a 3rd party payroll application, can be found in the Payroll Export section of this document.
Employee Tax and Withholding Information
Federal Tax Information Tab
Federal Marital Status - Enter the Employee's Federal Marital Status to be kept on File. Options include Married, Single, or Head of Household.
Federal Exemptions - This field will allow you to enter the number of exemptions claimed by the employee.
Additional Federal Withholdings - This field will allow you to enter any additional amount the employee wants to withhold for federal taxes.
State Tax Information Tab
State Marital Status - this field will allow you to select the State Marital Status for the state withholdings you can select from Married, Single or Head of Household.
State Exemptions - This field will allow you to enter the number of exemptions claimed by the employee.
Additional State Withholdings - This field will allow you to enter any additional amount the employee wants to withhold for state taxes.
State Tax Authority - This field will allow you to enter the State Tax Authority for the employee.
Local Tax Information Tab
![]()
Local Exemptions - This field will allow you to enter the number of exemptions claimed by the employee.
Additional Local Withholdings - This field will allow you to enter any additional amount the employee wants to withhold for local taxes.
Local Tax Authority - This field will allow you to enter the Local Tax Authority for the employee.
Direct Deposit Information
The Direct Deposit tabs of the Payroll Profile Tab within the Employee Demographics section permit entry of direct deposit details to be kept on file. The form permits entry on details for up to four accounts to which employee earnings can be dispersed. Disbursements can be configured as set dollar amounts or percentages of the employee's pay check.
Settings Tab
Settings Tab - General
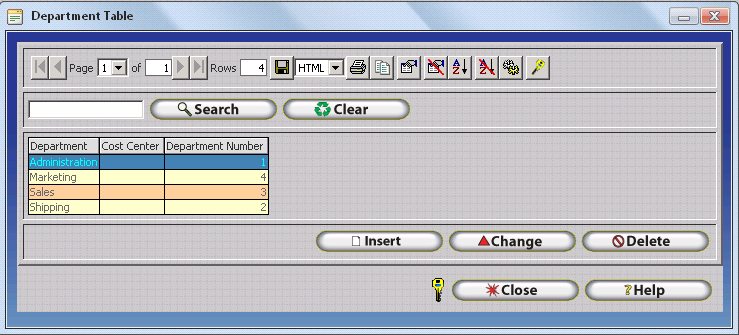
Default Department: This field is required. The Department selected here will appear each time an employee logs in to the system, or scans their assigned Employee Card. This drop down list contains all created Departments, (See Departments).
Default Policy: Select the appropriate Policy for the employee. This field is required. All policies that have been inserted into the software are available from the Magnify Glass.
Accrual Type: Select the appropriate accrual type for the employee.
Holiday Schedule Type: Select the appropriate Holiday Schedule type for the employee.
Security Role: Select the security role that describes this employeeâs interaction with the InfiniTime software.
Escort: Should the employee login to the InfiniTime Escort Module, the employee will see the escort window specified by this field. This helps make InfiniTime more user friendly for employees with minimal computer skills. Nearly all software actions and windows can be assigned to a single button and displayed in an organized manner for easy access. Refer to the Escort section of this document for more information.
Access Control Group: If your company is using access control equipment in conjunction with Access Control Groups, you can use this field to assign employees to a specific access control group.
Supervisor Name: Select the employeeâs supervisor.
Settings Tab - Groups
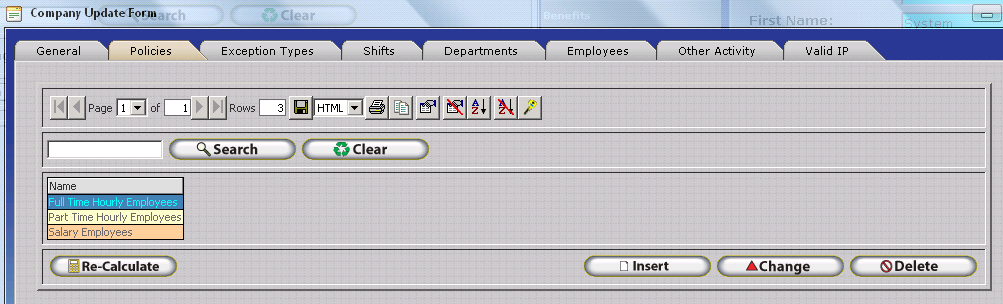
InfiniTime requires groups to be assigned to each employee when groups are present in the system. The first group description inserted for every group level will automatically be set as the default group and will be assigned to any employee who does not have a group assigned. If this is undesirable Inception Technologies recommends creating a group entitled unassigned. Any employees who are not intended to be assigned to a group should then be assigned to the unassigned group. It should be noted that any group can be designated as the default. Keep in mind that new employees will automatically be assigned to the default group and will remain on the default group until their groups are manually assigned.
NOTE: Group Levels and Group Descriptions must first be configured before employees can be assigned to groups. Additional Details regarding configuring Groups within InfiniTime can be found in the Groups Configuration Section of this document.
The Groups tab will display all available Groups that an employee can be assigned to. Assigning employees to groups provides additional options for report filtering. To assign a group description to an employee simply click on the drop down box and select the group you wish to assign to the employee. To remove an employee from a group click the delete button.
NOTE: The Groups Tab will be blank if Group Levels and Group Descriptions have not been configured within the InfiniTime Database.
Employee Group Update Form
Group - Enter the Name of the Group Description to which the employee belongs. Alternatively, Click on the Lookup magnify glass to select the desired Group Description from the Group Description Table.
Login Tab
The login tab displays employee login information. This information is used to logon to the InfiniTime software and clock in or out of work using the InfiniTime Employee Module. More information is provided below.
ID and Password
- These fields are required and are used to login to the various InfiniTime Manager Modules. You can either ask your employees to provide you with an ID and password or designate one for them. The ID and Password should be easy for the employees to remember. These fields will accept any characters, (alpha or numeric) or a combination of characters.
Clock ID and Password
- These fields are required and are used to identify employees at hardware time and attendance terminals. The Clock ID and Password must be numeric only and may not contain letters. It is recommended that the Clock ID and Password be easy for employees to remember as they will need to use them regularly at the terminal to punch in and out.
Badge ID Number
- Enter the employeeâs barcode or magstripe badge number in this field to assign that card to the employee. All digits of the number must be included for the system to identify the card and employee. If the card has a pair of asterisks, do not include the asterisks.
Technical Note: The Badge Field will not be displayed if the software license has a badge reader count of zero (0).
Security Filter
- The Security Filter Button opens the Employee Security Filter Update Form which permits InfiniTime Administrators to define the specific Employees, Departments, Jobs, and Tasks which the respective employee may access within the InfiniTime Software. The Employee Security Filter is considered an integral piece of the InfiniTime Software's security system. Additional details on the use and configuration of Employee Security Filters can be found in the Security Configuration Section of this document.
User Must Change Password at Next Logon - this checkbox if checked it will force the employee to change their password next time they log into the software whether they are login into the manager module, employee module, or escort.
Limit Employee Login to the Following TCP/IP Addresses - In this section you can enter different TCP/IP Addresses of computers this specific employee can access the software you can read more about the valid IP addresses in the [Security
- Valid IP Addresses Section](Security/SecurityOverview.md#sec23_Valid_IP_Addresses-_Overview) of this document.
Accrual Totals Section
The Accrual Totals Section displays employee accrual total records and is intended for reviewing and adjusting accrual totals on an employee by employee basis. Employee Accrual Total records are generated according to the existing accrual configuration within InfiniTime and the Accrual Type assigned to the employee.
The Employee Accrual Totals Table displays all Employee Accrual Total records for the respective employee. If a supervisor should step away from the computer for a moment when reviewing employee Accrual Totals, notice that the Title Bar of the Employee Accrual Totals Table shows the Employee's name. In fact - all sections of the Employee Update Form display the name of the employee whose Employee Profile is displayed. It is important to note that the Employee Accrual Totals Table displays all employee accrual total records for each Accrual Calculation across all Accrual Types in the employee's assigned Accrual Class from date of hire (or effective date) to the current date. Employee accrual total records are maintained by the InfiniTime Accrual System and are automatically recreated based on an employee's assigned accrual type if they are deleted. It is not possible to filter records on the Employee Accrual Totals Table such that only Accrual Totals for the current accrual period are shown, or to specifically delete accrual totals from a single year in order to prevent a specific employee from accruing hours in that accrual period. The Base Amount, as outlined below, is the primary method for making minor adjustments to a single employee's accrual totals.
It is recommended that customers who find it necessary to make use of the base amount on a regular basis to adjust employee accrual totals review the Accrual Types configured within InfiniTime to determine if a slightly different calculation would better suit the needs of the customer's organization. For example, it may be that a small group of employees do not fit will in their existing Accrual Class and a separate Accrual Class with distinct settings for each accrual type should be configured and assigned to that specific group of employees.
The following details are displayed for each Employee Accrual Totals record in the Employee Accrual Totals Table:
Type - Displays the Accrual Calculation Name to which the Employee Accrual Total Record belongs.
Date and Thru Date - Displays the Start Date and the Through Date for each Employee Accrual Totals record. This date range is determined by the Carry Over Reset Type set for the respective Accrual Calculation. Additional details on available Carry Over Reset Types such as Calendar Year, Anniversary, and Fiscal Year (Accruals Plus Only) can be found in the Accruals Configuration Section of this document.
Base Amount - The Base Amount permits manual adjustment of the Total Time Remaining for the respective Employee Accrual Totals record. A positive amount entered into the Base Amount field will add additional hours to the Employee Accrual Totals record. A negative amount entered into the Base Amount field will subtract hours from the Employee Accrual Totals record. The most common use of the Base Amount field is to enter a starting balance for employees as carried over from the customer's prior accrual tracking system. An effective date can then be set for all accrual calculations from a specific date and InfiniTime will continue to accrue hours for employees from that date forward. The second most common use of the Base Amount field is to make one time adjustments to employee accrual totals for individuals by either adding or subtracting hours from the employee's accrual total records.
Carry Over Amount
- Displays the total number of hours carried forward from the prior accrual period. The Carry Over Amount will be blank if the respective accrual calculation does not have Carry Over enabled.
Time Accrued - Displays the total number of hours accrued for the respective accrual calculation / accrual period in accordance with the Accrual Type(s) within the Accrual Class the employee is assigned to.
Time Accrued Plus Base - Displays the adjusted total of the Carry Over Amount, Time Accrued, and the Base Amount entered by the user.
Time Used - Displays the total number of Other Activity Hours deducted from the Accrual Calculation during the respective accrual period through use of Other Activity Types configured to deduct from the Accrual Calculation. IE: Sick Time, Vacation Time, etc.
Time Remaining
- Displays the total number of hours remaining for use during the respective accrual period.
Accrued Wages Earned - Reflects Accrued Hours in Dollars. Accrued Wages Earned are calculated by multiplying total accrued hours by the employee's default wage. The Accrued Wages Earned column will be blank if the respective employee does not have a default wage defined.
Accrued Wages Remaining - Reflects Remaining Accrued Hours in Dollars. Accrued Wages Remaining are calculated by multiplying remaining accrued hours by the employee's default wage. The Accrued Wages Earned column will be blank if the respective employee does not have a default wage define.
Employee Accrual Detail Table
Details - The Details Button permits employee's and supervisors to view all instances at which hours were added to or subtracted from an employee's accrual calculation for the respective accrual period. In this way, the employee and / or supervisor may review the exact calculation performed by the InfiniTime Accrual system and the exact dates on which employees were awarded hours for comparison with their own records. To view Employee Accrual Detail records, also referred to as Accrual Posting records, select the Employee Accrual Total Record you wish to review from the Employee Accrual Totals Table and then click on the Details button.
Additional details on configuring InfiniTime Accrual Types can be found in the Accruals Configuration Section of this document.
Badge Numbers Section
If your company is using badges in conjunction with a Zephyr clock you have the option of assigning additional badges to an employee for separate departments. This allows employees to simply swipe the badge for the department they wish to work in instead of switching departments with the Employee Module or Zephyr Clock function key. It should be noted that this tab will not be displayed if the Software License has a badge reader count of zero (0).
Inserting Badge Numbers
- Click Insert
![]() .gif)
.gif)
- Enter the badge number that will be used to swipe in and out for the new department.
Employee Badge Update Form
 .gif)
.gif)
- Select the department that will be associated with the above badge.
- Click OK to save the entry.
 .gif)
.gif)
Holidays Section
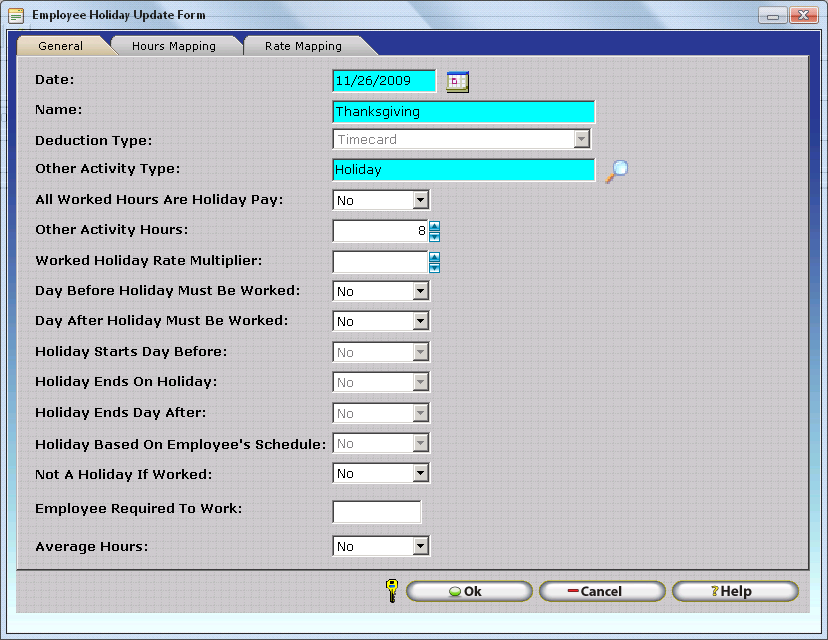
The Holidays Section of the Employee Update Form permits InfiniTime Software Administrators to define employee specific holidays. In this way, Paid or Unpaid Leave for specific occasions observed by specific employees can be automatically inserted into the employee's timecard without additional manual entry. Employee specific holidays are configured in the same manner as Company Wide holidays with one exception. Employee specific holidays do not include any tenure information as they are entered specifically for an employee and are automatically awarded as long as the employee meets any conditions defined for the specific holiday date.
Insert â Displays the Employee Holiday Update form. Used to insert a new holiday type. Each holiday that will be assigned to the specified employee must be configured and inserted individually using this option.
Change
- Opens the Employee Holiday Update Form for the selected Holiday Date. The InfiniTime Administrator may then alter the Holiday's configuration as desired. It is important to note that InfiniTime does not permit the Holiday Date to be changed once a Holiday Date has been configured and timecard records have been created for the holiday date. A new Holiday entry must be created for every specific date on which employees are to be automatically awarded paid and / or unpaid leave hours according to holiday settings. For example, Holiday Dates for 2012 should be created for 2012 and retained within the database after 2012 is over. Holiday Dates for 2013 should then be configured for each respective holiday observed by the organization.
Technical Note: Customer's who choose to ignore the above instruction and change holiday dates from year to year may observe that employees intermittently receive their Paid / Unpaid leave hours. This occurs because InfiniTime specifically checks to determine if an Other Activity Record has been created for a given holiday date for a specific employee before creating another holiday record. In this way, any employee who received the 2012 holiday will not be awarded a 2013 holiday if the Holiday Date is changed from 2012 to 2013. As of InfiniTime 7.08, the InfiniTime User Interface will specifically prevent users from changing the date of a holiday if one or more Other Activity timecard records are associated with the holiday. However, users on earlier versions of the software may observe this issue if the above instruction is ignored.
Delete
- Deletes the selected Holiday Date from the Employee's Profile.
Holiday Master Holiday Update Form

Holiday Options and Related Settings for Employee Specific Holidays are the same as those for Company Wide Holiday Types. Please refer to the Holiday Configuration section of this document for details on Holiday Options available on the Holiday Master Holiday Update Form..
Important Dates Section
The Important Dates Section of the Employee Update Form permits entry of Important Date values on an employee by employee basis. Important Dates allow the InfiniTime Software Administrator to define specific events which are of mission critical importance for individual employes. (IE: CPR Certification Expiration Date for a Pool Management Company that hires lifeguards.) Once employee Important Dates have been defined, theImportant Dates Report can be used to view upcoming employee Important Dates. Before Important Dates can be defined for individual employees Important Date Names must first be defined.
Employee Important Date Update Form

Name - Enter the first few characters of the Important Date Name to auto fill the Important Date Name or use the Lookup Magnify Glass to select the desired Important Date Name from the Important Date Table. For ease of entry, it is recommended that the Important Date Names for all Important Dates to be tracked by an organization be entered into the Important Dates Name Table prior to creating Employee Important Dates. This field is required and must be entered.
Reference Date
- Enter the first date on which the important date should occur. The Important Date will display on the Important Dates report for the respective employee for the first time on this date. The important date will then reoccur in accordance with the Important Date Interval.
Interval - Select the desired interval from the drop down menu. The following options are available:
- Annually - Causes the Important Date to reoccur every year on the same Month and Day.
- Monthly - Causes the Important Date to reoccur every month.
- Bi-Weekly - Causes the Important Date to reoccur every two weeks (14 days).
- Weekly - Causes the Important Date to reoccur every week (7 Days).
- Daily - Causes the Important Date to reoccur every day.
- Custom - Permits the user to enter a custom interval, in days, for the important date to reoccur. IE: 90 Days, 120 Days, etc
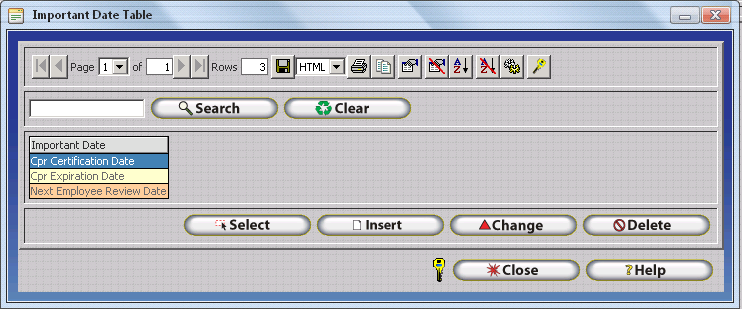
Important Date Table
![]()
Insert â Displays the Displays the Important Date Update Form which is used to enter a new Important Date Name.
Change
- Opens the Important Date Update Form for the selected Holiday Date. The user may then alter the Important Date Name as desired.
Delete
- Deletes the selected Important Date Name. It should be noted that InfiniTime will not permit an Important Date Name to be deleted if it has been assigned to an Important Date for an employee.
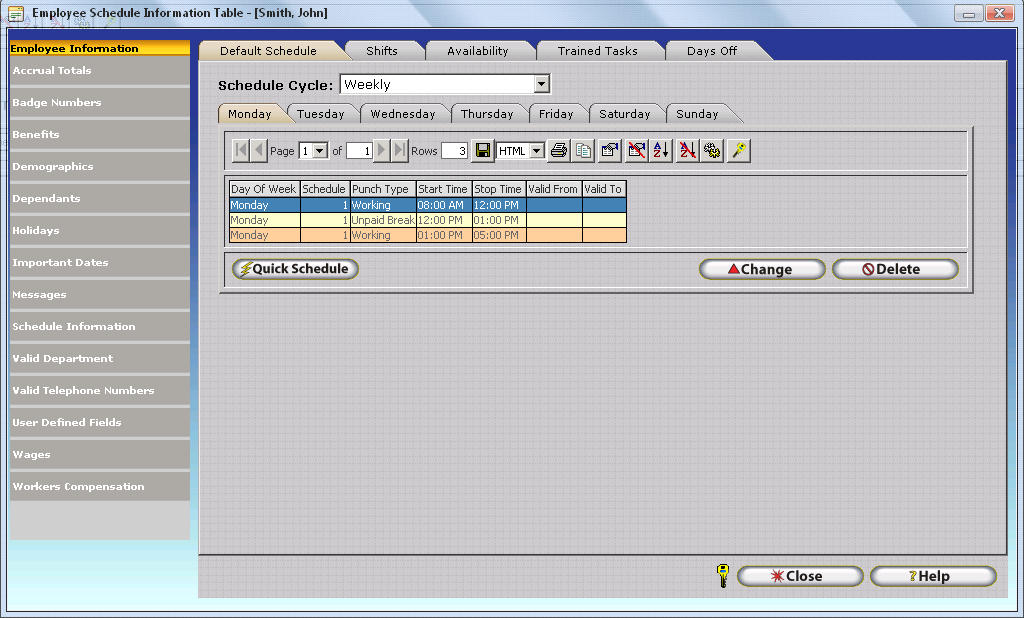
Schedule Information Section
The Schedule Information Section of the Employee Update Form includes all employee specific Schedule Related settings. It is important to note that Schedules within InfiniTime follow a hierarchical order. The employee record schedule takes precedence over every other schedule type except for the Schedule GANTT chart. Refer to the Scheduling Configuration section of this document for more information about use of the Schedule GANTT chart.
Default Schedule
The default schedule within an employeeâs record is used to enter a schedule that is intended solely for the selected employee. It is important to note that this schedule is not required, but if it is used it will take precedence over most other schedules in the software including the department schedule and shifts as outlined below. Only changes made in the Schedule GANNT chart take precedence over the Employee Default Schedule. The hierarchy, as listed below, is arranged by schedule priority from top to bottom. In this way, schedules can be defined in multiple areas within the InfiniTime Software according to an organization's needs. InfiniTime will automatically apply schedules to employee's based on the Schedule Hierarchy to determine an employee's effective schedule for any given date. Additional details regarding the Schedule Hierarchy can be found in the Scheduling Configuration section of this document.
| Scheduling Method | Schedule Hierarchy Priority |
|---|---|
| Schedule GANNT Chart Entries _ Created via Skeletons _ Created via Quick Schedule _ Created via 'New Working' on the Right Click Menu of the GANNT Chart | 1 |
| Employee Default Schedules _ Defined within Employee Profiles (IE: Employee Update Form - Scheduling Information Section - Default Schedule Tab) | 2 |
| Shifts Assigned to an Employee _ Shifts are Configured via the Shift Table _ Shifts are assigned to employees within Employee Profiles (IE: Employee Update Form - Scheduling Info Section - Shifts Tab) | 3 |
| Department Default Schedules _ Defined for a specific Department on the Department Update Form _ Associated with Employees based on their Department as assigned within Employee Profiles (IE: Employee Update Form - Demographics Section - Settings Tab) | 4 |
| Policy Default Schedules _ Defined for a specific Policy on the Policy Update Form _ Associated with Employees based on their Policy as assigned within Employee Profiles (IE: Employee Update Form - Demographics Section - Settings Tab). | 5 |
For example, the default schedule defined on an employeeâs policy would be ignored if a default schedule were configured for the employee in their employee or department record. Before configuring employee specific schedules, it is recommended that customer's review the Scheduling Introduction Section of this document for details on the benefits of tracking employee schedules within InfiniTime. In this way, InfiniTime Software Administrators can make specific decisions with regard to how employee schedules are created to ensure the best scheduling method for your organization's unique needs is chosen.
To create schedules select the ![]() button from the Default Schedule Tab in Schedule Information. The
Employee Schedule Cycle defaults to weekly but can be customized by changing
the Schedule Cycle to Custom. The custom schedule cycle permits a schedule
to repeat every several days, as specified by the user. The reference
date is considered day one of the schedule.
button from the Default Schedule Tab in Schedule Information. The
Employee Schedule Cycle defaults to weekly but can be customized by changing
the Schedule Cycle to Custom. The custom schedule cycle permits a schedule
to repeat every several days, as specified by the user. The reference
date is considered day one of the schedule.
![]() .gif)
.gif)
Quick Default Schedule
The Quick Scheduler allows you create a schedule by directly typing in the start and end times. To create the default schedule, start by clicking on the tab for the day of the week. In the Start Time field under the Regular Hours column, type in the starting time. Next, in the End Time field, enter the time that this Regular working period ends (ie ends before a lunch break, or the end of the day.) Continue the process until the entire shift has been completed.
Start Time
- In this field you can enter the start time for the Regular Hours, Paid Break, and Unpaid Break.
End Time
- In this field you can enter the end time for the Regular Hours, Paid Break, and Unpaid Break.
NOTE: It is often difficult to schedule breaks. As a rule, scheduling related exceptions are rigid and function in accordance with Rounding and Grace Period Settings on an employee's policy. Exceptions will be generated if employees do not take breaks exactly as scheduled. It is generally only recommended to schedule breaks if they must be taken at a specific time such as in a production environment where breaks are triggered by site wide bells or chimes. Otherwise, Breaks should not be scheduled.
Valid From
- Is the date in which the schedule will start to be valid.
Valid To
- Is the date in which the schedule will end being valid.
NOTE: The Valid From and Valid To fields are not required, if the fields are blank then the schedule will always be valid.
Copy Button
- The copy button will open the Copy Quick Default Schedule Window which can be used to copy the schedule configured for a specific day of the week o other days of the week.
Copy Quick Default Schedule Window
To copy the schedule from day to day, click the copy button to bring up the following form:
Copy From
- Use the pull down menu to select the day you wish to copy schedule configuration from.
Copy To
- Place a check in each box that you wish to copy the schedule to then click OK to copy schedule configuration to each selected Day of the Week.
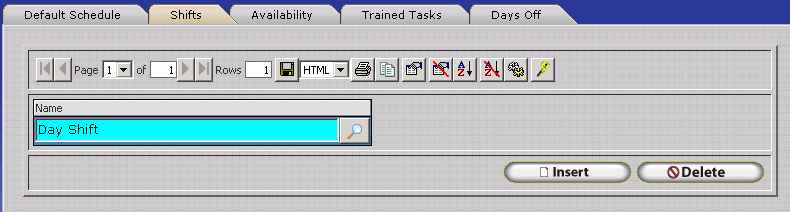
Shifts Tab
The shift tab is used to assign shifts to an employee. Employees can be assigned to more than one shift. InfiniTime will automatically choose the appropriate shift according to the employeeâs clock in time. An employee's clock in time must fall within the grace periods set in their policy in order for their activity to be associated with a shift. For example, an employee clocks in 30 minutes prior to their shift. Grace Period settings are configured to consider this as an âEarlyâ punch. The employeeâs time will be considered on the shift. Refer to the Policy Configuration section of this document for more information on grace periods.
Assigning a shift to an employee:
- Click Insert.
 .gif)
.gif)
- Type the name of the shift you wish to assign into the box or use the Lookup Magnify Glass to select the desired shift from the Shift Table.